
Creating Agar Art
A how-to guide on creating agar art.
AGAR ARTART
Sunskritha R Shivaprasad
6/2/20242 min read
After emptying the medium onto a clean petri dish and replacing the lid, place the flask inside a biosafety cabinet that has been thoroughly cleaned. Let it settle and become solid for about one hour. After that, flip it over and let the plate a day to dry. The targeted bacteria can be "painted" or "streaked" onto the agar plate that has solidified once they have dried. To transfer a small quantity of germs onto the plate to create the correct composition, a platinum inoculating loop of the proper size is heated until red hot for sterilization. Droplets of the bacterial culture can also be applied to the agar plate using a pipette.
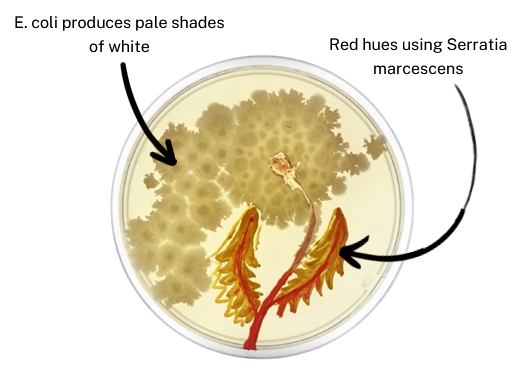
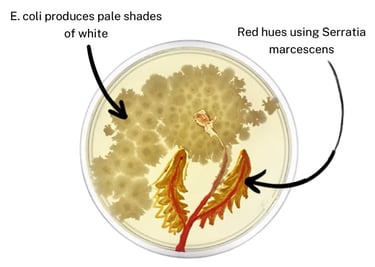
Bacteria such as E. Coli, Pseudomonas aeruginosa, Serratia marcescens, or Staphylococcus aureus are used to produce white, blue, yellow, or red colors, respectively.
A petri dish, agar, an inoculating loop, and an overnight bacterial culture are some of the components used in agar art. It involves incubation, bacterial injection, and agar medium preparation.
The composition that will be placed on the agar plate is first chosen and sketched onto a transparent agar plate using a circular paper template that is the same size as a petri dish. Although this step optional, it's a great way for beginners to take control of their work.

Materials require to make the agar media
Brown: Bacillus subtilis, Proteus mirabilis
Pink-red: Micrococcus roseus, Serratia marcescens
Orange: Streptococcus agalactiae
Yellow: Micrococcus luteus, Staphylococcus aureus
Blue-green: Pseudomonas aeruginosa, Pseudomonas fluorescens
Purple: Chromobacterium violaceum
Transparent: E. coli
Bioluminscent: Vibrio fischeri
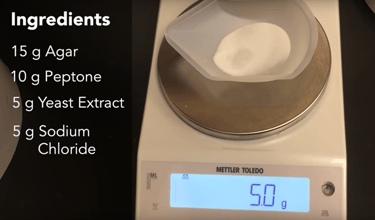
Next, the agar medium is prepared. 1.5 g of agar, 1 g of peptone, 0.5 yeast extract, and 0.5 NaCl are needed for 100 mL of distilled water. This is combined, mixed into a flask, covered with a screw lid, and autoclaved for 30 minutes at 121 °C to sterilize the medium and get rid of any contaminants. Following autoclaving, the flask is brought into the laboratory and allowed to cool until the media is warm, about half an hour.
Prepping Your Agar Plate:
Executing your composition:
With the use of a sealing film like parafilm, the plate is shut and sealed. After that, it is kept in an incubator for twenty-four hours at 37 °C to allow the bacteria to develop.
Knowing details about the bacteria being used will result in more control over the composition and control over the bacteria being grown, which will improve the final result, since different bacteria grow and mature at different rates at different temperatures. If the desired drawing has not been obtained after the 24-hour period, the bacteria can be allowed to develop for an additional 48 hours at room temperature.
Lastly, the agar plate can be placed on a light box that emits light at the proper intensity. This allows the artwork to be seen clearly before it grows to fill the space and turn into a brilliant sea of microorganisms.
Watching your artwork come to life:
An agar art piece using different species of bacteria
Colors that can be produced by different bacteria are shown below
Making the Agar Media:
1.
2.
3.
4.
